
Toiling away on the treadmill at the gym earlier this week, the exercise struck me as being even more boring than usual. Why? Well, I could hardly see what was going on on the TV screen because of glare! The exterior light was so bright that the visibility of the screen was effectively zip. I wondered why nobody had thought about that when they were planning the gym? The fact that the treadmills and steppers would be facing the large windows was certainly not lost on the designers. So why didn’t they consider possible problems from glare when they designed the place?
Why am I griping about this? Actually for the simple reason that it triggered the idea for this post – lighting design.
When we designed our family home a few years back, we decided to hire a lighting consultant. After all, we did not have a clue as to how to go about this and our architect was pretty busy with everything else. The task of placing hundreds of light fittings was daunting to say the least … help was quite welcome! Apart from the consultant, I also made a quick search on Amazon to look for a good book on the topic. After some trial and error, I found one that particularly appealed to me: Sage Russell’s the Architecture of Light. I read it cover to cover before meeting the lighting consultant, to make sure I would be able to ask relevant questions and use the correct language. As I consider good lighting as absolutely essential for well-being, this topic was simply too important to me not to get involved.
If one wants to change the mood of a space, change the lighting. If one wants to change the scale of a space, change the lighting. If one wants to change the color of a space, change the lighting. – Russell (2008, p. 17)
Russell’s book suggests an approach that I found absolutely fascinating: Instead of simply “lighting a place up”, it describes how to systematically layer a place with light …
But what does that mean?
When thinking about the necessary lighting in a space, Russell suggests to go through 5 steps (or layers) …
A Five Layer Approach to Layering Light
- In the first one, you seek to choreograph the experience of somebody visiting the place. You use light to guide a visitor through your space and help them orientate themselves. In other words, you place lighting such that the eyes of the visitor are drawn to a particular point. That point should be far away – at the far end of the space. Its function is to attract the visitor’s attention and thus make them scan the space in the process as they look around, and (hopefully!) walk towards the light beacon across the room. (Anything else might end in faceplanting the wall. An unfortunate experience, I’m sure.)
- The second layer consists of thinking about the lighting needed to create a particular ambiente (relaxed vs. work) and to determine the brightness of the space. Warm (yellowish) and diffuse light sources create a warm and comfortable ambiente while cool white and directional light create a more sterile, work-related context. Dentist, anyone?
- In the third step, you look for objects that you would like to highlight: pieces of art, sculptures, the dining table, etc. Once you have selected them, you are ready to position your accent lights.
- Step number four then consists in using light to stress architectural features. Maybe you have a beautiful, high ceiling that you would like to present (quite literally) in its best light? Or maybe you would like to turn your gorgeous natural stone wall into a focal point? Focusing some directional light on a fireplace will bring out its shape and make the visitor aware of it. Or what about using uplights to highlight columns or wall washers to display an interestingly curved wall?
- Finally, in step five, you look at adding light sources to help you perform tasks, such as reading, painting, cooking, ironing and so forth.
So far, all of this sounds quite idiot-proof. After all, installing five different sets of light fixtures isn’t all that difficult… right? Well, in truth, it’s not quite that straightforward. Some light sources chosen in an earlier layer may actually fulfil double or triple duty in subsequent layers. For example, a light source may serve as a guiding light (LAYER 1), but also help create a particular ambience, perhaps because it can be dimmed (LAYER 2), highlights architectural features (LAYER 4) or functions as an accent light (LAYER 3). In other words, the layering approach points out not only where light is needed, but also leads us to discover where certain lighting needs overlap. As a result we may be able to do just fine with much less light than originally thought. This is not only good news for the environment, but it most likely improves your lighting design as well. Russell (2008, p. 23) notes in this context that
“When we place light with care, the result is a more profound statement likely created with less total light.”
Interestingly, we can also get away with less light, as our eyes have a remarkable ability to adapt. We can read a book both in bright daylight and when the moon is up. Consequently, we don’t need to turn our homes into spaces that are as brightly lit as if we were in a hospital or on the factory floor. (That would just turn it into a very uncomfortable place. Keep thinking dentist.) Further, defining brightness simply in terms of quantity of light is not entirely correct either. Here again, we need to consider the interaction between lighting source and our visual system. What happens is that our brain converts contrast into a perception of brightness. For example, if we light up only one spot in an otherwise dark room, this particular area appears very bright to us – regardless of whether it is objectively bright compared to say, daylight, or not. This gives us another opportunity to play with (less) light by striking the right balance between directional and diffuse light sources, to achieve the effects (or the profound statement) we are after.
A practical illustration
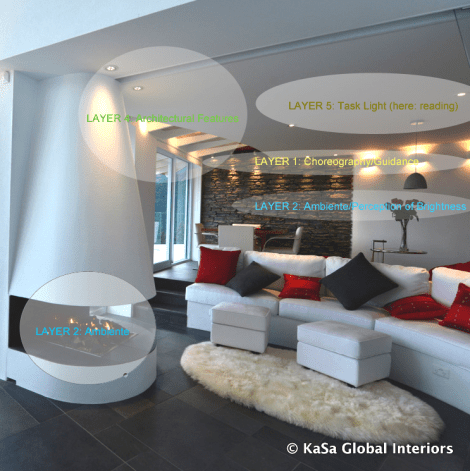
Before it gets too theoretical, let’s take a look at the picture above. Imagine yourself standing where the photographer took the shot. Now, pretend all the light fixtures are off, all except for the ones washing down the natural stone wall. Where do you think you will direct your gaze as you enter the room? Correct, towards that wall. This is why these wall washers form part of LAYER 1 (together with the ribbon shaped plaster light fittings to the right of them). Now that we have the direction, let’s move to LAYER 2 and add ambient lights. Our lighting consultant insisted on dimmers wherever possible. For this reason, all the lights you see in this picture can be dimmed. This means that the wall washers and plaster lights (from LAYER 1) do not only function as guiding lights, but also help create the desired ambiente. Another member of the LAYER 2 group is the gas fire. Clearly, light sources don’t have to be electrical … Gas and wood fires certainly qualify as ambient lights! LAYER 3 is then formed by accent lights. Unfortunately, there is none shown in the picture. But I can assure you, we have one in the room just around the corner. It’s an art light. It comes in the form of a directional recessed spot and is part of a series of spots that are installed in the ceiling to light up the hallway. Thus, this particular access light also does double duty as a member of the LAYER 1 group. Returning to the picture, we can see that we also use light to display the rafters in the ceiling next to the window and to bring out the shape and texture of the hood of the fireplace. Rafters, fireplaces, curved walls, etc. are architectural features. The light fixtures highlighting these thus belong to LAYER 4. (In our case, they also belong to LAYER 2, since they can be dimmed). Finally, as we still thought that there was not enough light to read when sitting on the sofa, we added two task lights (recessed spots) above it (LAYER 5).
I hope this example successfully demonstrated how the system works. If you would like to know more, I highly recommend Russell’s excellent book. It is very well written, and full of information and examples.
If you have any problems with lighting in your own home, give the layering option a shot before giving in to despair. Oh, and before I forget, one more thing: air does not reflect light, and we cannot light it up. What we light up are surfaces (walls, ceilings, art objects etc.) So always place a light source such that the light will be reflected! Lighted surfaces are our medium!


Pingback: Scale – how to reconcile a big space with human dimensions? | KaSa Global Interiors·
I find it fascinating how strategically placed lights can influence our perception and movement within a space.
LikeLike