
One of our earlier posts describes what happened when my daughter Natasha and I took our markers along to sketch the shores of beautiful Lake Tahoe. Unexpectedly, it seems to be a post many people gravitate towards. Reading it over, I wondered what we could do to make it more helpful from a technical point of view. After all, that post is mostly an exercise in narrative, and to be truly worth referencing from, probably ought to have a bit more meat on its bones!
To make up for its fallacies, I have now collated a sizeable collection of drawings to show you, step-by-step, how I use Copics to render a variety of materials, from wood, to copper, to concrete, fabric, stone, carpet, wicker and leather. For the majority of these materials, I first illustrated a number of close-ups to get a feel for the material in question (an exercise I highly recommend investing time in. Though I was skeptical at first, I found it to be invaluable for building up a mental library of both what the materials look like, and the techniques one can use to represent them. Only by doing the close-ups did I find I developed an appreciation for representing that same texture at a distance). Speaking of drawing materials at a distance: after going over the zoomed-in sketches, I want to share with you my methodology for taking a step back, and rendering the materials as they are used in a piece of furniture, or an entire room.
For your reference, I’ll list all the materials used for the drawings (Copics, coloured pencils, ink, white Posca pen, etc.), briefly describe the main steps of the drawing process, and illustrate them with step-by-step progress shots taken during the rendering process.
To get the best effect, I’d first recommend getting your hands on marker paper or blending cards (e.g. by Canson, X-press It, Copic). Normal copy paper soaks up too much ink, bleeds through, and won’t permit blending. A real bummer.
In the event that you prefer watching live-action rendering, you may want to check out Spencer Nugent’s excellent Youtube tutorials (the link will redirect you to the one on wood, though he and many others have created tutorials for what seems like every textural effect under the sun). I myself certainly benefitted greatly from watching his work, and cannot recommend video tutorials enough.
In any case, overall this was huge fun, and I am super excited about beginning this series. Hopefully these posts will prove useful to you, and that you may enjoy looking at and learning from the examples as much as I enjoyed making them!
This week, we start out with wood. In the weeks and months to come, we take each of the materials mentioned above in turn. Stay tuned!
How to render wood?

Wood samples
Wood is a natural material that comes in a rainbow different hues and patterns. No one piece of wood looks quite the same as any other, which is arguably one of its greatest appeals. Anything can affect the appearance of a piece of wood, from the tree it grows on, to the stain it’s finished with. Being particularly interested in the former quality, I referenced a selection of wood samples from all over the world, all of which possess particularly interesting grain marks and colouring. These include:
- Rosewood Santos (Brazil)
- Red Gum (USA)
- Walnut (flat-cut)
- Spanish Cedar (Central and South America)
- Walnut (burl)
- White Birch (quarter cut)
To cap off the exercise, I rendered an open plan living/dining room (based on a reference picture I tore out of a magazine).
Special tips for working with wood:
- Before starting your work, select your markers carefully. Try to find the two or three hues that match the main color and undertones of your wood most closely. Work only with those, ignore all others.
- Most wood renderings look more realistic if you add some ink at the end for texture (possible exception: blond woods -> see 4.)
- Wood is a natural material. Irregularities are normal – and thus need to be reflected in your rendering.
- For blond woods: treat them very carefully. Avoid using dark hues. Transitions are usually subtle. Try to blend as much as possible.
- To achieve realistic grain markings, work from the center of the markings out adding – following the pattern – progressively lighter hues.
- Coloured pencils (apart from pencil and ink) are a great way to add detail. Use them on top of your marker drawing.
- Towards the very end, wash over your rendering with the lightest Copic marker to smooth transitions and to unify your strokes. If you have used coloured pencil, make sure that you are not smudging these lines too much (in case that is not intended)
- For wood renderings from a distance, lose detail, but consider reflections of the finish, shadows, wood panel direction/joints, etc. -> see below.
I’d love to see what you create! And, as always, if you have any questions, don’t be afraid to ask.
Happy rendering!
Cheers, Sabine
Rosewood Santos (close-up)
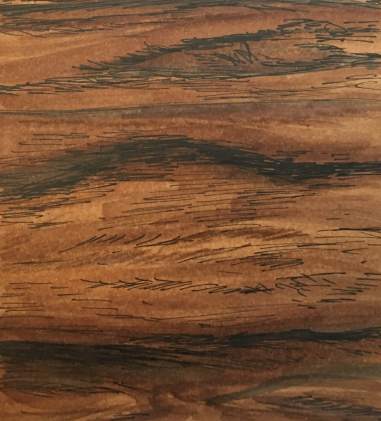
Close-up: Rosewood Santos
I used:
- Copic Markers: E35, E77, E57
- Ink Pen (0.1)
- Pencil
- Black colored pencil
Steps/Technique (reference: wood sample)
- Lay down the base colors (“from lightest light to darkest dark”)
- Add grain lines in black colored pencil, work darker brown colors (markers) around it
- Use ink pen for finer grain markings
- Smooth over entire rendering with lightest Copic marker (here: E35) to blur pen and pencil strokes.

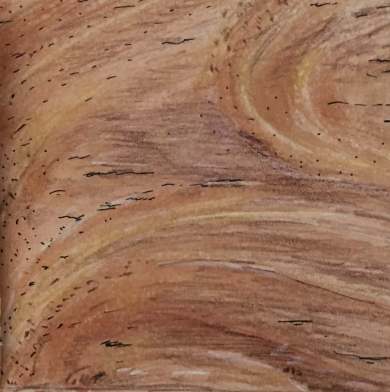
Red Gum (close-up)
Red Gum (close-up)
I used:
- Copic Markers: E27, E43, E51 and E95
- Pencil
- Off white, and light brown, salmon, beige color pencils
Steps/Technique (reference: wood sample)
- Lay down the base colors (from light to dark), leaving white streaks blank
- Use dark brown marker for stark grain markings
- Use pencil and colored pencils to refine grain markings
- Smooth over entire rendering with lightest Copic marker (here E35) to blur pen and pencil strokes.

Walnut (flat cut)
Walnut (flat-cut)
I used:
- Copic Markers: , E43, E44, E71, E74, W3
- Pencil
- Black and dark brown colored pencils
Steps/Technique: (reference: wood sample)
- Lay down base colors (from light to dark)
- Use E71 (this is a darker brown hue) to indicate major grain lines
- Refine grain lines and add “shadows” with markers and colored pencils
- Add fine horizontal lines with pencil
- Smooth over entire rendering with lightest Copic markers (here E43 and W3) to blur pen and pencil strokes.

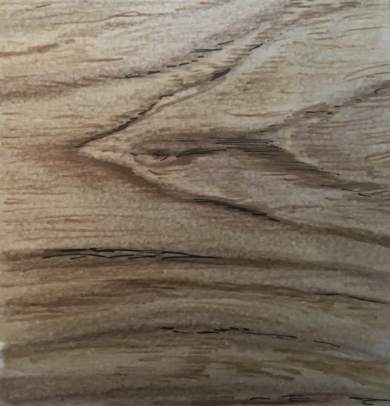
Spanish Cedar (close-up)
Spanish Cedar (close-up)
I used:
- Copic Markers: E15, E31, and E35
- Ink Pen (0.1)
- Pencil
- Black and beige Color Pencil
Steps/Technique (reference: wood sample)
- Lay down base colors (from light to dark), trace grain markings broadly
- Use pencil and colored pencils to refine grain markings
- Use pen for some of the characteristic dark feathery marks
- Smooth over entire rendering with lightest marker (here E31) to blur pen and pencil strokes.

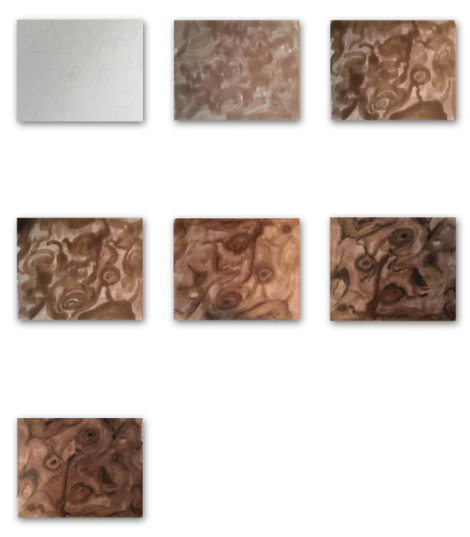
Walnut (Burl – close-up)
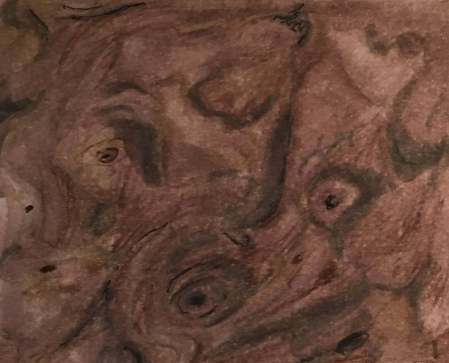
Walnut (burl wood)
I used:
- Copic Markers: W7, E71, E74, E77
- Ink Pen (0.1)
- Pencil
- Black Colored Pencil
Steps/Technique: (reference: wood sample)
- Sketch out the outlines of the grain pattern with pencil
- Lay down base colours (from light to dark)
- Use ink pen for grain markings
- Use pencil and colored pencil to refine grain
- Smooth over entire rendering with lightest Copic marker (here E71) to blur pen and pencil strokes.
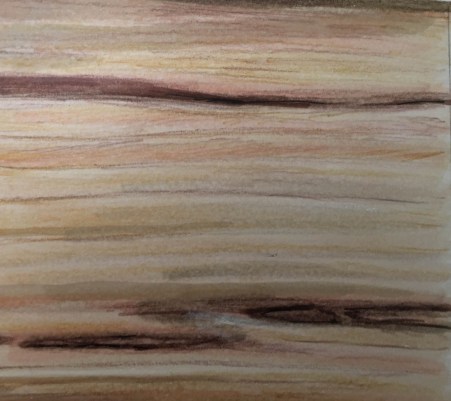
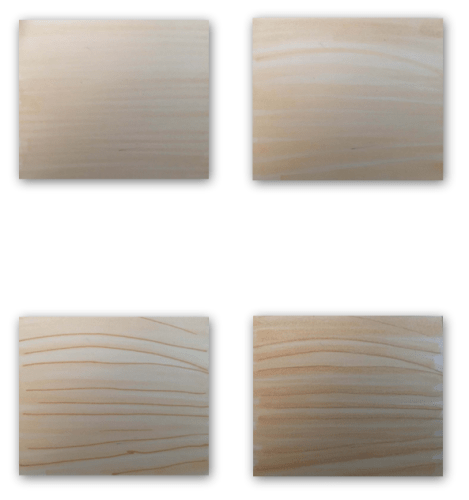
White Birch (quarter cut)
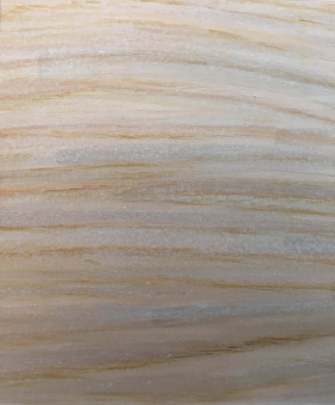
Birch (quarter cut)
I used:
- Copic Markers: E30, E33, E43 and Y23
- Pencil
- Light brown and white colored pencils
Steps/Technique (reference: wood sample)
- Lay down base colors (from light to dark)
- Use pencil and colored pencil to refine grain markings
- Smooth over entire rendering with lightest Copic marker (here E30) to blur marker and pencil strokes.
Living/Dining Room in blond wood
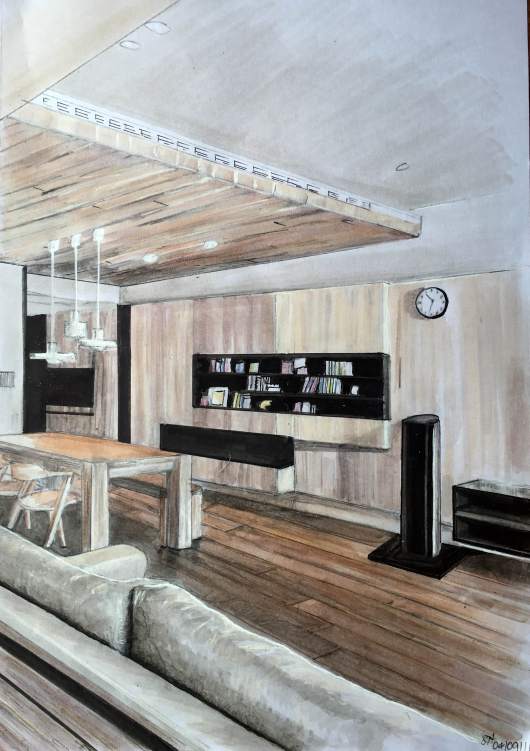
Living/Dining Room with blond wood
When you zoom out, that is, move from rendering a close-up to drawing an entire room, you will definitely lose detail. Rather than focusing on the nicks in the wood that give it its unique finish, one is forced to pay attention to a completely different set of characteristics that may not have been apparent at close-up level, e.g. how the wooden boards/panels are placed and joined, how the light of the window creates a subtle sheen on that part of the floor that is closest to the window, how the furniture is reflected, what kind of shadows it throws onto the wood, and so forth.
I used:
- Various Copic Markers
- Ink Pen (0.1)
- Pencil
- Various color pencils
- Uni Posca pen (white)
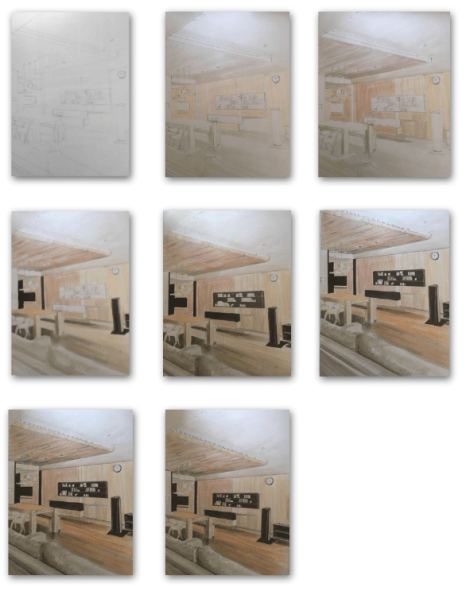
Steps/Technique (reference: photo)
- Roughly sketch interior in pencil. Make sure you get the perspective right! (Tip: if you’re still unsure of your vanishing points, don’t be afraid to trace from your source image. It’ll give you experience that will benefit your art in the long run!)
- Lay down base colours (from light to dark)
- Add black accents in black marker, tidy up with ink pen.
- Work on details of flooring, walls and furniture with markers, pencils, and Posca pen (use a ruler for flooring boards and other lines that need to be straight)


Pingback: Rendering Copper with Copic Markers | KaSa Global Interiors·
Pingback: Rendering Concrete with Copic Markers | KaSa Global Interiors·
I have been taught repeatedly over the years to never, ever use your Copics over colored pencils. The Copics will pick up little bits of the pencil and eventually ruin the tip.
LikeLike
Katie, thanks for your comment. Yes, you are right in that using Copic markers over colored pencil may ruin its tip. I have dedicated one (fairly neutral) Copic marker to this purpose and I am also using it sparely. In my opinion, the effect is worth the sacrifice.
LikeLike
Pingback: Best 14 how to render wood – lifefindall.com·