
Fresh from the Easter holidays, which I spent marveling at beautiful architecture, I wanted to continue my series on rendering with Copic markers with this post rendering… concrete. It may seem like a simple, not to mention ubiquitous material, but is in its own way as versatile and gorgeous as wood or metal or stone. (This is the third instalment of the series: in the first two, we looked at how to render wood and copper.)
Keeping with the format of the two previous posts, again we show you first how to render close-ups of different types of the material. Specifically, we are guiding you step- by-step through the rendering of:
Of course, the above list can only reflect a tiny sample of all the concrete types available – I can only invite you to explore and experiment! Concretes are mainly distinguished by the proportions of the main ingredients used in their composition. Sand, gravel, crushed stone and other aggregates largely determine whether we are dealing with cracked, crackled or other sorts of concrete surfaces. Keep an eye out for these different ratios as you walk around town; you might find it interesting to see which are used for what purposes!
Fine and coarse aggregates make up the bulk of a concrete mixture. Sand, natural gravel, and crushed stone are used mainly for this purpose. Recycled aggregates (from construction, demolition, and excavation waste) are increasingly used as partial replacements for natural aggregates, while a number of manufactured aggregates, including air-cooled blast furnace slag and bottom ash are also permitted. The size distribution of the aggregate determines how much binder is required. Aggregate with a very even size distribution has the biggest gaps whereas adding aggregate with smaller particles tends to fill these gaps. (Wikipedia)
The large number of available finishes brings even more variety to the scene. Concrete may be highly polished, sanded, left untreated, painted, stamped, brushed and so on. It also comes in many exciting patterns (“Cobblestone”, “French slate”, “Sandstone”, “English Fan Cobblestone”, “Old Granite”, …) and different hues. Last but not least, as shown above, the way concrete is poured, e.g. with formboard, also has a great impact on its final appearance.
Thus it is easy to imagine that, in theory at least, there is an infinite number of “concretes”; by far too many to present today, but I look forward to seeing anything you come up with! Just leave your drawings (or photographs!) in the comments below 😉
Starting out with Rendering Close-ups
So why do we start out with rendering close-ups of the material first? Doing so has the benefit of getting to really know the material, and how it may be best represented in a larger drawing. While tedious, I always found it came in tremendously handy later on.
That said, as with rendering other materials, as you zoom out you inevitably lose detail. All those small cracks and speckles that are so important in making a detailed concrete rendering look realistic simply disappear into a larger blur. At the same time, it becomes necessary to incorporate more macroscopic features such as shadows, reflections, light effects, and perspective, that are not part of the challenge when drawing a simple close-up.
At the end of this post, I will show you an example of how I tried to accomplish just that:
Hopefully, you will find the tips useful …
So, let’s get started, shall we?
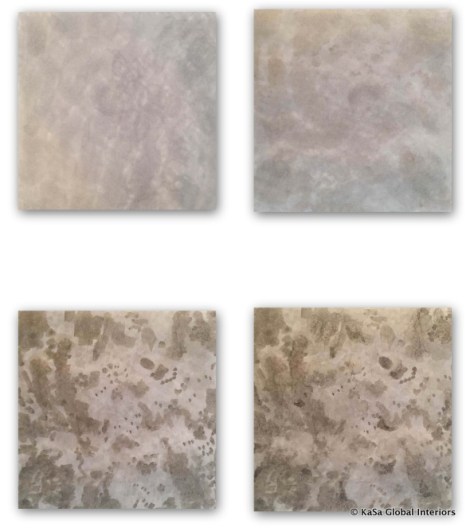
Cracked Concrete
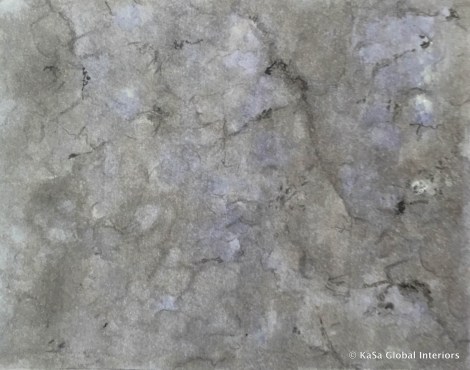
Close-up rendering of cracked concrete. Note the slightly bluish areas
I used:
- Copic Markers: N0, W1-W9, black, lavender/blue
- Ink Pen (0.1)
- Pencil
- White Posca Pen
- Color pencils in black, white, and all the colors of the rainbow.
Steps (using a reference picture)
- Sketch in cracks and major marks (with pencil)
- Use a marker (medium value) to delineate darker areas
- Work around “crack lines” to tease out the pattern (make use of various layers of grey)
- Dapple in white areas; tint some of them lightly with pale lavender
- Add dark spots and deep cracks with the ink pen and/or smudge them over a with black color pencil
- Smooth your rendering by going over everything with a light marker (no worries, if your marker looks dirty afterward, you can clean it easily by drawing on clean paper afterward)
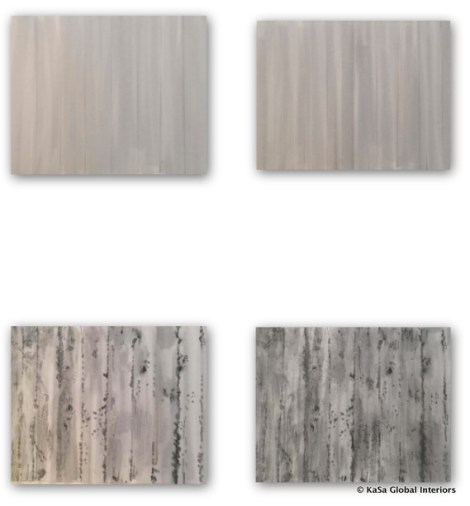
Concrete with Formboard Structure

Close-up rendering of concrete with formboard structure: keep the demarcating lines open and lose!
I used:
- Copic Markers: N1, W1-W6
- Pencil
- Black Ink Pen
- White Posca Pen
- Color pencils in white and black
Steps (based on reference foto)
- Use light markers to block in base color (vertical strokes)
- Work in layers, add more texture with progressively darker shades of grey
- Use ink pen and Posca marker to accentuate some, but not all edges of the form board pattern
- Stipple and draw in “impurities” using both ink pen and white Posca marker
- Smooth the rendering by going over everything with a light marker (W0 or W1) (here, your strokes should follow a vertical pattern if the formboard is arranged vertically)
Crackled Concrete (“adding impurities”)
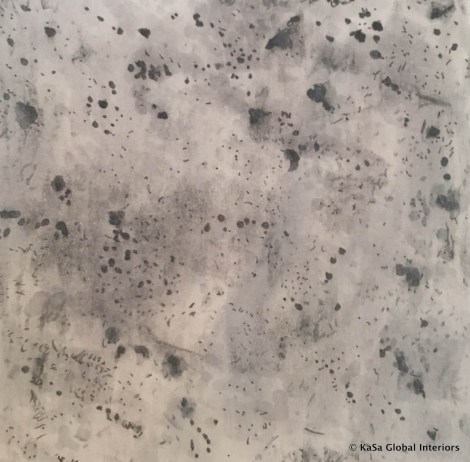
Close-up rendering of crackled concrete: add depth to the sprinkles by using more than one shade of grey/black
I used:
- Copic Markers: N1, N2, N3, N5, N8
- Pencil
- Black Ink Pen (005)
Steps (based on reference foto)
- Use light markers to block in the base color. Your strokes should roughly follow the underlying “pattern” of the concrete
- Work in layers: add more texture and depth with progressively darker shades of grey
- Use the ink pen and dark grey markers to stipple in dark dots. Larger dots should consist of at least two different colors. As they are supposed to represent “holes” and dents in the concrete, they should show a certain level of shading to create the illusion of “depth” necessary to make them convincing. Rendering them in black only will make your drawing look just speckled and flat.
- Smooth your rendering by going over (almost) everything with a light marker (N0/N1)
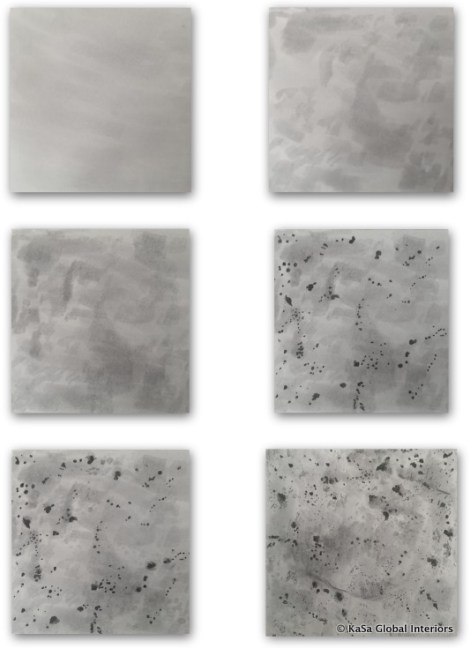
Concrete Flooring
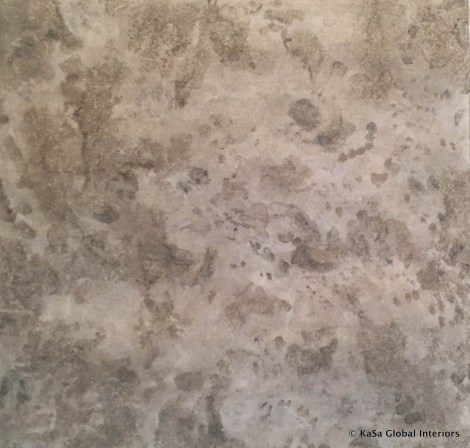
Close-up rendering of concrete flooring
I used:
- Copic Markers: N1, W0-W2, W5, W6
- Pencil
- Color pencil in grey
Steps (based on reference foto)
- Use light markers W0 and W1 to dapple in the underlying pattern; leave a few areas blank
- Use darker markers to accentuate selected areas (cloudy patterns)
- Stipple in even more dots in various shades of grey
- Smooth your rendering by going over everything with a light marker
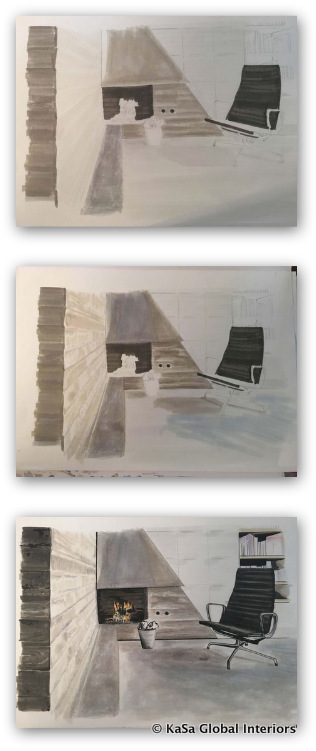
A Living Room with concrete flooring and walls
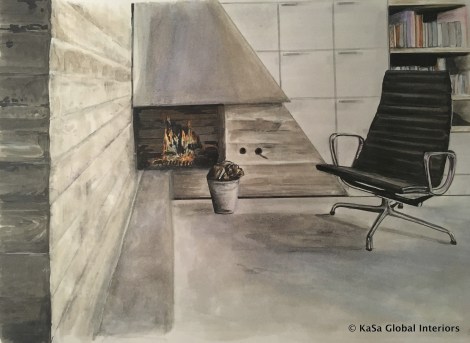
Rendering of living room featuring concrete floors and walls
I used:
- Copic Markers: N1, W1-W6, black, lavender, pinkish white
- Pencil
- Black Ink Pen (0.1)
- White Posca Pen
- Color pencils in white, black, red, blue, green (for books), orange and yellow (for fire)
Steps (based on reference foto)
- Sketch the room in pencil
- Block in major color areas with light grey markers, follow perspectives lines (and/or the texture of the concrete)
- Add a hint of lavender to the concrete flooring
- Use white color pencil to brighten up areas that receive more light (e.g. from a window)
- Use black ink pen and Posca marker to smoothen out the edges of the concrete, chrome (on chair), etc.
- Work on details (books, fire), etc.
- Smooth the rendering by going over concrete all the flooring (in particular, the transitions between light and shadowed areas), the wall and the bench. The stainless steel hood also benefits from smooth transitions between colors.
- Work in layers, add more texture and shadows with progressively darker shades of grey
So, now it’s your turn! Have fun!


Pingback: Rendering Wood with Copic Markers | KaSa Global Interiors·
Choosing the best flooring for your space is a big decision, so it shouldn’t be taken lightly. When it comes to flooring, there are many different options to choose from; each has its pros and cons that need to be weighed before being installed into your property.
LikeLike
This is a great tutorial on how to render concrete with Copic markers! I especially liked your tips on how to render cracked concrete and concrete with a formboard structure.
I’m curious to know more about how you would render concrete with different textures, such as smooth concrete or polished concrete. Do you have any tips for achieving these effects?
https://www.richlandsiding.com/
LikeLike