
This is the second installment of our “Rendering with Copic Markers” series. I hope you enjoyed the first one on wood. Today, I want to give you a quick guide to taking on a very different challenge: the rendering of metal. I glossed over metals like chrome, gold, and bronze in favor of copper, simply because I love its warm, beautiful hue.
That being said, the principles underlying copper rendering are 100% applicable to any other metal. You need merely change the base colors to match the metal’s specific color (just as, were you to render a purple carpet, you would use the same techniques as for a green one), and voila, you have stainless steel in place of brushed copper! This is because the question of which technique to apply largely boils down to the finish of the material, not the hue.
Yet even this has particular issues associated with it. After all, not all metal surfaces are made the same way. For this reason, I want to show you three types of copper, each with very distinct surface textures: brushed, hammered (beaten), and shiny.
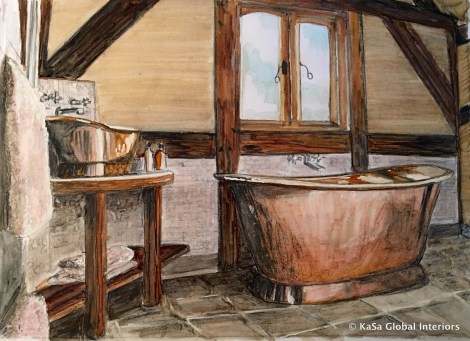
In the final example I will change perspective a little, and zoom out to take the context of copper objects into consideration. In this case, a copper bathtub and sink, prominently positioned in the middle of a bathroom. To draw these items, I had to follow a slightly modified set of rules, which are detailed below. Generally speaking, I realized that I needed to lose detail in order to take more macroscopic features – such as proper highlights and shadows – into consideration. Only thereby was I able to properly represent the overall shape and texture!
One very important thing when drawing metals: the highlights are often very, very distinct. It’s what makes them look shiny. Therefore, I’d advise getting your hands on a nicely opaque white pen, or using acrylic white paint with a fine brush.
Let’s get started!
- Copper (brushed)
- Copper (hammered/beaten)
- Copper (shiny cylinder and block)
- Copper (copper bathtub and sink)
Copper – Brushed

Brushed copper – the brushed effect was achieved with the help of tiny pencil strokes in different colors, all pointing in the same direction.
I used
- Copic Markers: W1-4, E95, R00
- Ink Pen (0.1)
- Pencil
- Black, baby pink, eggshell, white colored pencils
Steps/Techniques (based on reference photo)
- Lay down the base color (start with lighter hues)
- Use gray markers to sketch in the darker areas here following a vertical pattern (if you look at any metal, you’ll find that the tones vary according to a bar-like structure)
- Gradually work out the values for all areas: dark, whitish, rust, salmon, cream… don’t get carried away, though! We’ll bring more variation into it later, so try to focus on four or five. Note that some transitions are fairly sharp while others are very, very smooth. Therefore it’s best to avoid treating all transitions the same way: those reflections aren’t following artificially regular patterns, and neither should you!
- Add fine, white and gray horizontal lines (for the “brushed” effect). Feather your strokes (i.e. don’t make super-solid lines; scribble a bit and keep light pressure on the pen). The contrast between base color and pencil strokes should be subtle. Keep the contrast between the lines and the base color to a minimum! For example, I chose light gray to shade over the salmon tones instead of black.
- Smooth over the entire rendering with the lightest Copic marker to blur pen and pencil strokes together, creating a unified surface. This is essential since otherwise the strokes may appear too stark, and the subtle brushed effect is gone.

Copper – Hammered/beaten
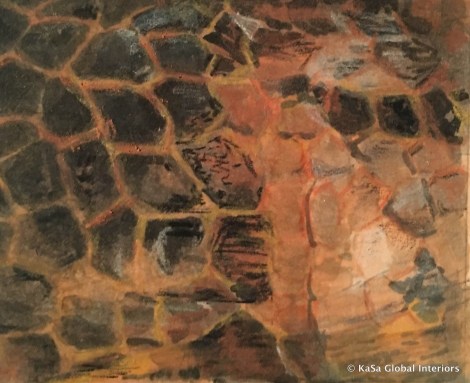
Hammered copper – each cell reflects the light differently
I used
- Copic Markers: W1-3, W5, W8, E95
- Ink Pen (0.1)
- Pencil
- Colored pencils in black, terracotta, and white
Steps/Techniques (based on reference photo)
- Lay down the base colors, mark the light and dark areas
- Pencil in “hammered pattern” (the lighter the pencil the better, or the lines may ultimately affect your rendering)
- Gradually work out the values – black to white, rust to light salmon – the difference to the brushed copper is that you’ll need to pay extra close attention to individual “cells”. Not only do the tones vary from cell to cell, but each cell has its own characteristics and tonal gradient. The lines separating the cells are also extremely important, and they too differ in color and value.
- Add highlights in white and delineate cells in terracotta and black
- Smooth over the entire rendering with your lightest Copic marker to blur pen and pencil strokes.

Copper – Shiny cylinder and block
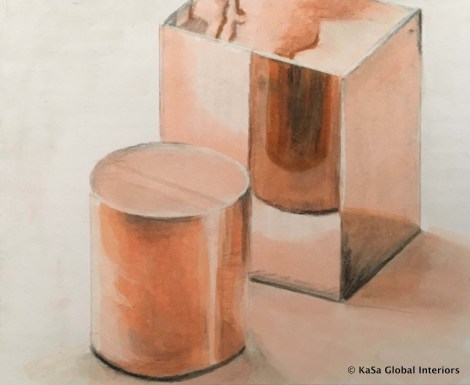
Shiny copper cylinder and block: Getting the reflections right is essential. Note, e.g. how the shadows reflect in the surfaces as well
I used
- Copic Markers: R00, E95, YR27
- Pencil
- Posca Pen (White)
- Color pencils in black, terracotta and white
Steps/Technique (based on reference photo)
- Sketch out the shapes
- Lay down base colors across both areas, leave white areas blank

Unfortunately, I have just got one “steps picture” for you here – I simply forgot to take any more while drawing …
- Pencil in the shape of the reflection, as well as the way the shadows which the objects cast are reflected in the objects themselves. Sounds complex, I know, but you’ll get the hang of it!
- Gradually work out the values, and add the shadows they cast (both on the floor and mirrored in the shiny surface of the objects)
- Add highlights in white
- Smooth over the entire rendering with your lightest Copic marker to blur pen and pencil strokes!
Bathroom with copper bathtub and matching sink
I used
- Copic Markers: W1, W3, W5, W6, E95, V000, R00, YR27
- Ink Pen (0.1)
- Pencil
- Ink Pen
- Posca Pen (white)
- Color pencils in black, terracotta, beige, middle brown, pink, and white
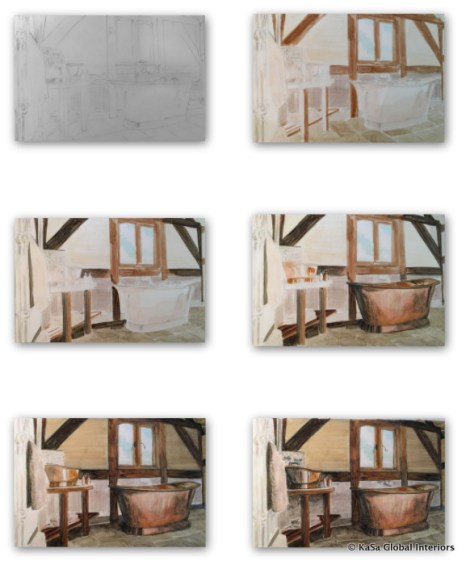
Steps/Techniques (based on reference photo)
- Sketch the room
- Add base colors to delineate major “color blocks”
- Gradually work out the values, paying attention to the individual “cells” which are often formed by the shapes of furniture. For example, the body of the bathtub, its base, its interior, and its rim
- Add highlights, bolster them with white color pencil, and clean up the whole thing with ink pen
Now – it’s your turn! 🙂
Since Christmas is coming up, perhaps try your hand at drawing some shiny baubles! Though the techniques are relatively straightforward, the final results have great potential to impress. I always find it fascinating how a non-shiny material (the marker paper) can be given the illusion of being reflective, almost like magic.
Happy Holidays!


Pingback: Rendering Concrete with Copic Markers | KaSa Global Interiors·
Pingback: Rendering Wood with Copic Markers | KaSa Global Interiors·